
Parametri del processo di stampaggio a iniezione: come ottimizzare temperatura di fusione, pressione e tempo di raffreddamento.
Parametri del processo di stampaggio a iniezione: la vera chiave per la qualità dei pezzi
Essere un bravo stampatore non significa memorizzare le impostazioni della macchina, ma gestire la fisica del processo di stampaggio a iniezione.
Ogni parametro – temperatura di fusione, pressione di iniezione, compattazione e tempo di raffreddamento – è interconnesso. Modificandone uno, tutti gli altri si modificheranno di conseguenza.
Se si desidera una qualità costante dei pezzi, una minore percentuale di scarti e una produzione stabile, è necessario comprendere come queste variabili fondamentali interagiscono tra loro.
1. Temperatura di fusione: il fondamento dello stampaggio a iniezione
Parola chiave principale: temperatura di fusione nello stampaggio a iniezione
La temperatura di fusione definisce il modo in cui la plastica fluisce nello stampo.
Troppo bassa → elevata viscosità
Iniezioni incomplete
Linee di saldatura deboli
Scarsa finitura superficiale
Troppo alta → degrado del materiale
Segni di bruciatura
Riduzione della resistenza
Fragilità
Miglior pratica
Iniziare con l'intervallo di temperatura raccomandato dal fornitore e perfezionarlo in base al comportamento del pezzo.
Una temperatura di fusione più elevata può migliorare il flusso, ma spesso aumenta il tempo di raffreddamento.
2. Velocità e pressione di iniezione: l'equilibrio critico
Parola chiave principale: pressione e velocità di iniezione
La velocità di iniezione determina la rapidità con cui la cavità si riempie, mentre la pressione fornisce la forza necessaria per spingere il materiale attraverso il sistema.
Velocità di iniezione
Troppo lenta → congelamento prematuro
Troppo veloce → turbolenza, intrappolamento d'aria, bruciature
Pressione di iniezione
Troppo bassa → riempimento incompleto
Troppo alta → bave, stress dello stampo
Approfondimento per l'ottimizzazione
Se la macchina raggiunge i limiti di pressione, verificare:
Viscosità del materiale
Dimensioni e design del punto di iniezione
3. Compattazione e mantenimento: controllo del ritiro
Parola chiave principale: compattazione, pressione, stampaggio a iniezione
Dopo un riempimento del 95%-98%, il processo entra nella fase di compattazione.
La plastica si ritira raffreddandosi: la compattazione compensa questo fenomeno alimentando ulteriore materiale nella cavità.
Difetti comuni dovuti a un imballaggio inadeguato
Ritiri
Vuoti interni
Peso del pezzo non uniforme
Regola fondamentale
La pressione di mantenimento deve continuare fino al congelamento del punto di iniezione. Dopodiché, le dimensioni del pezzo sono bloccate.
4. Tempo di raffreddamento: il fattore di costo nascosto
Parola chiave principale: tempo di raffreddamento dello stampaggio a iniezione
Il tempo di raffreddamento rappresenta in genere il 60%-80% del tempo totale del ciclo.
Questa fase determina:
Efficienza del ciclo
Stabilità dimensionale
Rischio di deformazione
Errore comune
Abbassare eccessivamente la temperatura del refrigeratore → condensa sullo stampo → difetti del pezzo
Ottimizzazione più intelligente
Migliorare la portata del refrigerante
Pulire le incrostazioni all'interno dei canali di raffreddamento
Utilizzare inserti ad alta conducibilità termica
5. Temperatura dello stampo: finitura superficiale e Stabilità
Parola chiave principale: controllo della temperatura dello stampo
La temperatura dello stampo influisce direttamente su:
Aspetto della superficie
Livello di lucentezza
Visibilità delle linee di saldatura
Temperatura dello stampo più elevata
Migliore riproduzione della superficie
Aspetto migliorato
Riduzione delle linee di saldatura
Compromesso
Tempo di raffreddamento più lungo
Per i materiali semicristallini (come PA, POM): la temperatura dello stampo influisce anche sulla cristallinità, che a sua volta influenza la stabilità dimensionale a lungo termine.
Ottimizzazione dello stampaggio a iniezione: pensare in termini di sistemi, non di impostazioni
L'errore più grande nello stampaggio a iniezione è trattare i parametri in modo indipendente.
In realtà:
Modificare il tempo di raffreddamento influisce sul ritiro
Regolare la compattazione influisce sulle tensioni interne
Modificare la temperatura influisce sul flusso e sulla pressione
� Lo stampaggio a iniezione è un sistema a circuito chiuso
Buona pratica: Definisci la finestra di processo
Una volta trovata la combinazione ottimale di parametri:
Documentala
Standardizzala
Controlla le variazioni
L'incoerenza del processo è la causa principale di:
Scarti
Deformazioni
Fluttuazioni di qualità
Un'officina disciplinata e basata sui dati avrà sempre prestazioni migliori di un'officina che si affida all'"intuito" dell'operatore.
� CTA (Invito all'azione)
Se hai problemi con difetti dei pezzi, tempi di ciclo o produzione instabile, di solito non si tratta di un problema di un singolo parametro, ma di un problema di sistema.
� Hai bisogno di aiuto per ottimizzare la progettazione del tuo stampo o il processo di iniezione? Visita il sito www.xinkeymould.com o contatta il nostro team di ingegneri per una consulenza professionale.
PER SAPERNE DI PIÙ
Manutenzione degli stampi a iniezione: lista di controllo essenziale e migliori pratiche
Basta con le "riparazioni improvvisate": il vero ROI di una manutenzione disciplinata degli stampi a iniezione
Considerate il vostro stampo a iniezione come il cuore pulsante e performante della vostra fabbrica. Se sottoposto a una corretta manutenzione, tutto funziona senza intoppi. Se trascurato, si trasforma rapidamente in un problema, aumentando gli scarti, causando fermi macchina e innescando costose riparazioni di emergenza nei momenti meno opportuni.
Una routine di manutenzione disciplinata non si limita alla pulizia dell'acciaio. Si tratta di proteggere il vostro programma di produzione e di prolungare la vita di una delle vostre risorse più costose.
La dura realtà delle presse
Gli stampi sono strumenti di precisione che operano in condizioni estremamente difficili. Ogni giorno sono sottoposti a enormi forze di serraggio e a ripetuti shock termici, a volte superiori a 300 °C. Allo stesso tempo, i materiali abrasivi, in particolare le resine rinforzate con fibra di vetro, usurano continuamente le superfici in acciaio.
Quando la manutenzione viene ignorata, i problemi non si manifestano gradualmente, ma si aggravano. Una leggera usura si trasforma in perni che si grippano, cursori bloccati e sfiati ostruiti. Una volta che gli sfiati si ostruiscono, i gas intrappolati causano bruciature e difetti, innescando una spirale negativa nella produzione.
Persino i canali di raffreddamento non sono immuni. Nel tempo, i depositi minerali limitano il flusso, riducendo l'efficienza del raffreddamento e compromettendo la qualità dei pezzi. Rispetto al costo di una revisione completa o alla perdita di un cliente, la manutenzione preventiva è minima.
La checklist pre-volo: abitudini di produzione quotidiane
Prima di iniziare la produzione, dedica qualche minuto a un'ispezione di base, proprio come un pilota che effettua un'ispezione pre-decollo.
Verifica la presenza di problemi evidenti come:
Perni di espulsione rotti
Inserti scheggiati o danneggiati
Cursori usurati o disallineati
Saltare questo passaggio è rischioso. Individuare i piccoli problemi in anticipo è molto più semplice che affrontare guasti importanti durante la produzione.
Durante la produzione, non limitarti a osservare i pezzi, ma monitora l'intero processo. Variazioni dimensionali inattese o un aumento degli scarti sono segnali premonitori. Intervieni immediatamente prima che la situazione peggiori.
I controlli giornalieri fondamentali includono:
Salute termica: Verificare il flusso del liquido di raffreddamento e la sua uniformità di temperatura. Differenze anomale tra ingresso e uscita possono indicare ostruzioni o incrostazioni.
Pulizia degli utensili: Pulire regolarmente le linee di separazione e le superfici delle cavità. Evitare l'uso di utensili metallici su superfici lucidate: anche piccoli danni possono compromettere in modo permanente la qualità della finitura.
Piano di lavoro settimanale
Prevenire l'usura richiede una manutenzione costante e strutturata.
Ogni settimana:
Pulire e lubrificare tutti i componenti mobili (cursori, sollevatori, guide)
Rimuovere detriti e residui di grasso vecchio
Pulire i canali di sfiato con aria compressa
Gli sfiati ostruiti causano bruciature e scarti: questo passaggio è fondamentale.
Manutenzione mensile e trimestrale
Mensile (Monitoraggio delle tendenze): Utilizzare strumenti di misurazione calibrati per monitorare le dimensioni critiche. L'identificazione di variazioni graduali aiuta a prevenire guasti imprevisti.
Trimestrale (Manutenzione approfondita):
Smontare e ispezionare il sistema di espulsione
Controllare l'usura delle superfici di guida
Pulire e decalcificare i canali di raffreddamento
Sostituire eventuali componenti che mostrano i primi segni di fatica
Revisione annuale
Una volta all'anno, eseguire uno smontaggio e un'ispezione completi.
Verificare:
Corrosione o vaiolatura
Degrado superficiale
Crepe sottili causate dalla fatica
Altrettanto importante: esaminare i registri di manutenzione. Se lo stesso componente si guasta ripetutamente, il problema probabilmente risiede nella progettazione, non nella manutenzione. A quel punto, la vera soluzione è la riprogettazione.
Errori "ammazza-utensili" che riscontriamo troppo spesso
1. Utilizzo del lubrificante sbagliato: Non tutti i grassi sono adatti per gli stampi. Prodotti non corretti possono danneggiare l'acciaio o contaminare i componenti. Seguire sempre le raccomandazioni del produttore.
2. Serraggio eccessivo dei dispositivi di fissaggio: Una coppia eccessiva può allungare i bulloni e danneggiare gli inserti. Utilizzare una chiave dinamometrica e seguire le specifiche corrette.
3. Ignorare i sistemi di raffreddamento: le linee di raffreddamento funzionano come arterie. L'accumulo di incrostazioni riduce l'efficienza, aumenta i tempi di ciclo e crea punti caldi che influiscono sulla qualità dei pezzi.
4. Saltare la manutenzione a causa della pressione produttiva: ritardare la manutenzione durante le produzioni ad alto volume spesso porta a guasti imprevisti, di solito nel momento peggiore. La manutenzione programmata è sempre più conveniente delle riparazioni di emergenza.
In conclusione: la manutenzione è un'assicurazione
La manutenzione degli stampi a iniezione non è un costo, ma una protezione per la stabilità della produzione.
Uno stampo ben manutenuto avrà prestazioni e durata superiori rispetto a uno trascurato. La differenza si riflette in termini di tempo di attività, qualità e redditività a lungo termine.
Consigli finali
Create un programma di manutenzione chiaro e assegnate la responsabilità per ogni attività. La responsabilità è ciò che mantiene i sistemi in funzione.
Le officine che seguono routine disciplinate rimangono produttive. Quelle che non lo fanno finiscono per dover reagire costantemente ai problemi.
In definitiva, è semplice: o controllate la manutenzione, o è lei a controllare la vostra produzione.
PER SAPERNE DI PIÙ
Capire il “nemico invisibile”: perché la ventilazione dello stampo è fondamentale per il successo dello stampaggio a iniezione.
Introduzione
A prima vista, la cavità di uno stampo sembra vuota. In realtà, non lo è mai.
Ogni iniezione inizia con aria già intrappolata all'interno della cavità, e quest'aria deve pur uscire da qualche parte. Se non riesce a fuoriuscire correttamente, viene compressa rapidamente dal flusso del materiale fuso. Il risultato? Le temperature possono superare i 300 °C in pochi millisecondi.
In pratica, si crea una mini-camera di combustione all'interno dello stampo.
In officina, una ventilazione inadeguata è spesso la causa silenziosa di bruciature, difetti estetici e problemi di produzione inspiegabili.
L'importanza della compressione dell'aria
Durante l'iniezione, la plastica fusa scorre in genere a velocità comprese tra 20 e 200 mm/s. Mentre riempie la cavità, spinge l'aria che la precede.
Quest'aria deve uscire attraverso degli sfiati, solitamente piccole fessure sulla linea di separazione o tramite appositi sistemi di ventilazione.
La fisica è implacabile:
Compressione rapida = rapido aumento della temperatura.
In casi estremi, l'aria intrappolata si comporta come un motore diesel in miniatura, incendiando e bruciando la superficie della plastica.
Queste "bruciature da gas" non sono solo un problema estetico. Indicano un degrado del materiale a livello molecolare, che può compromettere la resistenza del pezzo e le prestazioni a lungo termine.
Oltre alle bruciature, il gas intrappolato crea ulteriori problemi:
Contropressione, che rende più difficile il riempimento
Difetti di stampaggio, in cui i pezzi non si formano completamente
Strisce di gas ("taglio da gas"), dove il flusso d'aria segna il fronte di fusione
Come eliminiamo effettivamente l'aria
Nella progettazione di stampi reali, lo sfiato si riduce alla creazione di vie di fuga affidabili. I metodi comuni includono:
Sfiati sulla linea di separazione
Questo è il metodo più utilizzato.
La chiave è la precisione:
Profondità tipica dello sfiato: 0,005–0,02 mm
Troppo stretto → l'aria rimane intrappolata
Troppo aperto → si verificano bave
Trovare il giusto equilibrio è dove l'esperienza nella costruzione di stampi conta di più.
Perni di sfiato
Utilizzati in nervature o cavità profonde dove l'aria tende a rimanere intrappolata.
Diametro tipico: 2-4 mm
Forniscono vie di fuga dirette dalle zone problematiche.
Scanalature e inserti di sfiato
Per geometrie complesse, i canali di sfiato poco profondi convogliano l'aria verso le uscite.
In casi più impegnativi, gli inserti in metallo poroso (acciaio sinterizzato) consentono all'aria di passare attraverso il materiale stesso, risultando particolarmente utili in cavità profonde o complesse.
Sfiato sottovuoto
Utilizzato in applicazioni di alta gamma come i pannelli per autoveicoli.
Invece di affidarsi alla pressione per espellere l'aria, un sistema a vuoto la rimuove prima ancora che inizi l'iniezione, garantendo condizioni di riempimento ottimali.
Problemi comuni in fabbrica
Bruciature a fine riempimento
Segni scuri nell'ultima area di riempimento indicano solitamente che l'aria intrappolata non ha modo di fuoriuscire.
Iniezioni incomplete "fantasma"
Se una zona non si riempie nonostante la pressione applicata, è probabile che si tratti di una bolla d'aria che funge da cuscinetto.
L'aggiunta di uno sfiato esattamente in quel punto spesso risolve il problema immediatamente.
Compromesso tra bave e sfiato
Troppo spazio per lo sfiato → bave
Troppo poco → segni di bruciatura
Raggiungere il giusto equilibrio è una sfida costante.
Linee di saldatura deboli
Quando i fronti di flusso si incontrano ma non si uniscono correttamente, la causa è spesso la presenza di gas intrappolato.
Uno sfiato adeguato nel punto di incontro migliora significativamente la resistenza della saldatura.
Consigli professionali per una migliore progettazione degli stampi
Progettare lo sfiato fin dalle prime fasi
Non considerare lo sfiato come una fase secondaria. Identificare le trappole d'aria durante la fase di analisi del flusso dello stampo.
Utilizzare sfiati a gradini
Iniziare con una sezione poco profonda per bloccare la plastica, quindi passare a un canale più profondo per il flusso d'aria.
Aggiungere più percorsi di sfiato
Per lunghezze di flusso elevate, posizionare gli sfiati ogni 50-100 mm. L'aria non dovrebbe dover percorrere l'intera lunghezza della cavità.
In conclusione
Lo sfiato non è un dettaglio secondario, ma un fattore fondamentale per le prestazioni dello stampo.
Uno stampo ben ventilato:
Si riempie più facilmente
Richiede meno pressione
Produce pezzi più uniformi
Riduce difetti e tempi di inattività
Cercare di correggere la ventilazione dopo che lo stampo si è indurito è costoso, lento e spesso frustrante.
Farlo correttamente fin dall'inizio non significa solo garantire la qualità dei pezzi, ma anche evitare costi inutili e mantenere la produzione senza intoppi.
PER SAPERNE DI PIÙ
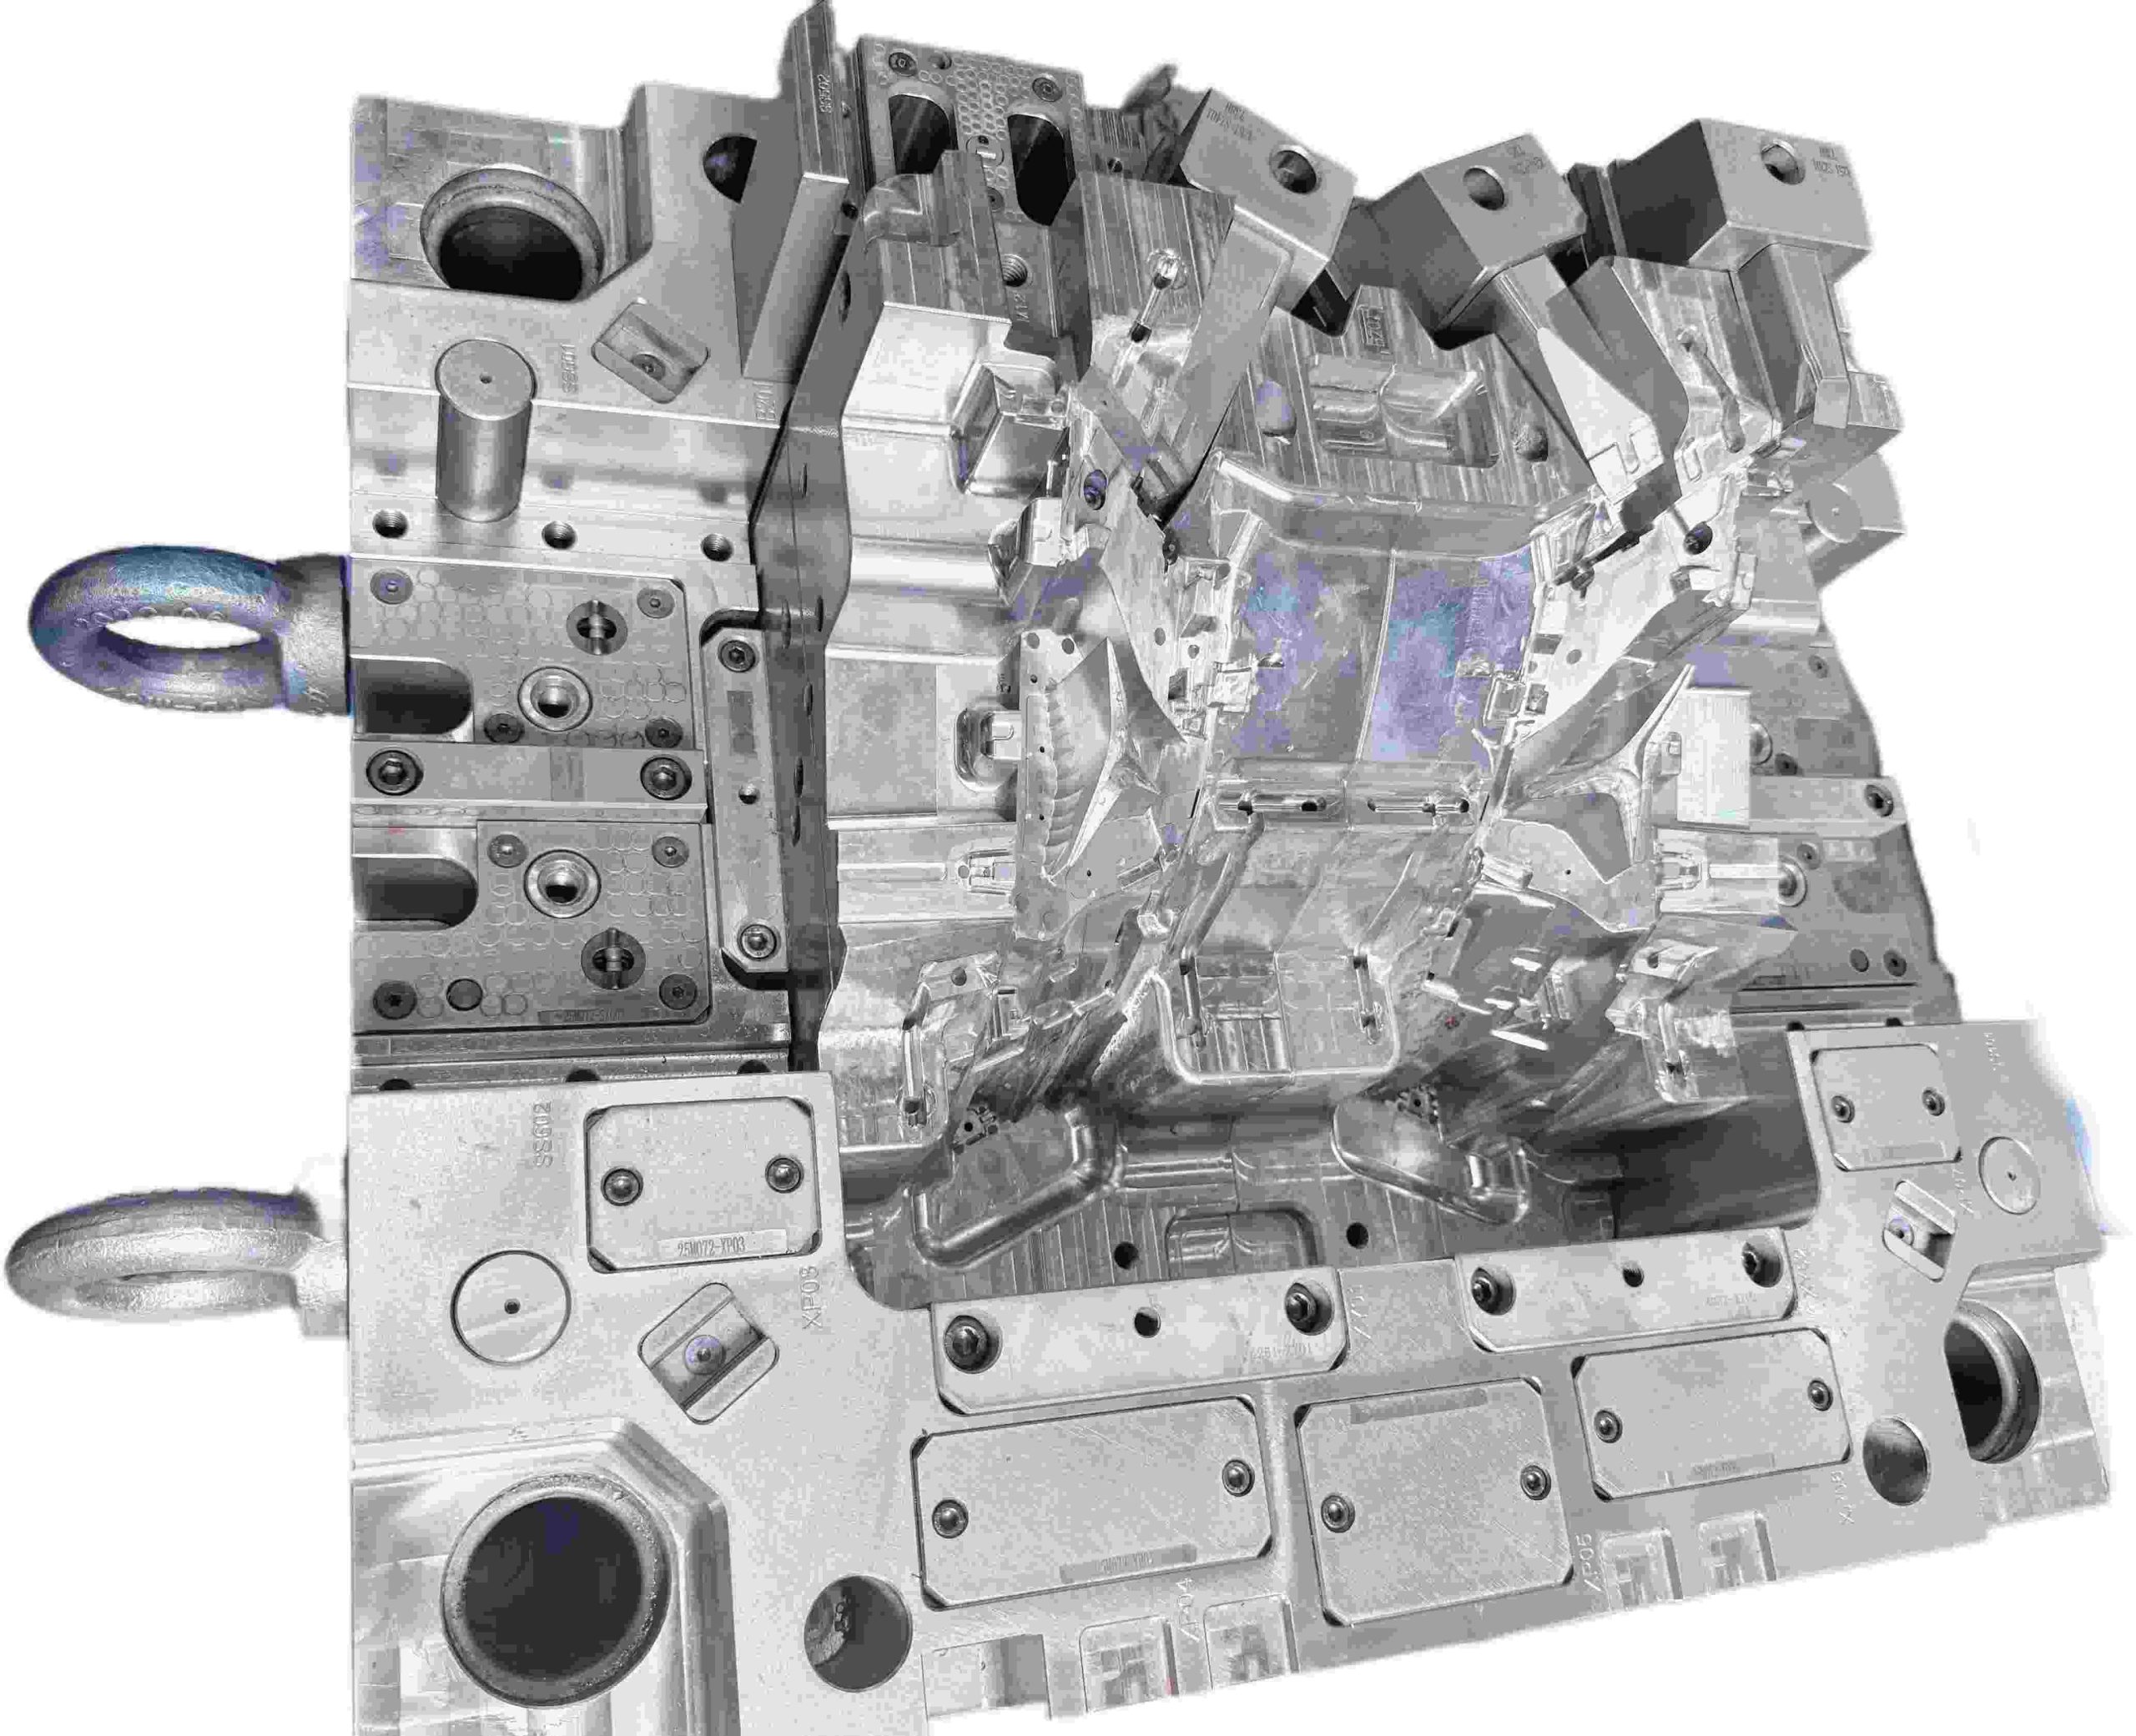
Progettazione del cursore per stampi a iniezione: struttura, funzione e migliori pratiche
Introduzione
I cursori (chiamati anche elementi laterali o anime laterali) sono componenti dello stampo che si muovono perpendicolarmente, ovvero ad angolo, rispetto alla direzione di apertura dello stampo. Vengono utilizzati per formare e rilasciare i sottosquadri esterni che altrimenti impedirebbero l'estrazione diretta del pezzo. Per i progettisti di stampi che lavorano su componenti in plastica complessi, la comprensione della progettazione dei cursori è fondamentale.
Cos'è un cursore per stampo?
Un cursore è un componente mobile dello stampo che si sposta lateralmente durante la corsa di apertura per rilasciare i sottosquadri esterni su un pezzo stampato. È tipicamente azionato da un perno angolare (chiamato anche perno a camma o perno a corno) montato sulla metà fissa dello stampo.
Quando lo stampo si apre, il perno angolare spinge il cursore verso l'esterno. Durante la chiusura dello stampo, il cursore viene guidato indietro nella sua posizione di lavoro, pronto per il ciclo successivo.
Per garantire la stabilità durante l'iniezione, il cursore è bloccato in posizione da un blocco di bloccaggio (cuneo di bloccaggio). Senza questo supporto, l'elevata pressione nella cavità, che spesso raggiunge centinaia di tonnellate, può forzare il cursore fuori posizione, causando bave o variazioni dimensionali.
Per la costruzione standard degli stampi, per il corpo del cursore si utilizzano comunemente acciai per utensili pre-temprati come il P20. Tuttavia, nelle applicazioni ad alto volume, il solo P20 non è sufficiente. Spesso si aggiungono inserti temprati o piastre antiusura nelle zone ad alto contatto per ridurre l'attrito, migliorare la resistenza all'usura e prolungare significativamente la durata dell'utensile.
Il cursore è guidato da guide o colonne di guida per mantenere l'allineamento durante tutta la sua corsa. La distanza di corsa deve essere almeno pari alla profondità del sottosquadro più un margine di sicurezza di 2-3 mm.
Perché i cursori sono necessari
Molti componenti in plastica presentano elementi come fori laterali, filettature, ganci, clip o geometrie incassate sulle superfici esterne. Questi elementi creano sottosquadri che impediscono l'espulsione in linea retta dallo stampo.
Senza un sistema ad azione laterale come un cursore, il pezzo rimarrebbe bloccato meccanicamente nella cavità. Qualsiasi tentativo di espellerlo direttamente rischierebbe di danneggiare il pezzo, usurare lo stampo o addirittura interrompere la produzione.
In pratica, il cursore funge da meccanismo di rilascio obbligatorio: deve ritrarsi completamente prima che il sistema di espulsione si attivi. Se la temporizzazione non è corretta, il pezzo può rimanere incastrato, causando potenziali danni e tempi di fermo imprevisti.
Rispetto ai sollevatori interni, i cursori sono generalmente più robusti per i sottosquadri esterni. Sono azionati dal movimento di apertura dello stampo e bloccati meccanicamente contro la pressione di iniezione dal blocco di supporto, il che li rende adatti ad ambienti di produzione ad alto volume dove sono richiesti milioni di cicli.
Un vantaggio fondamentale dei cursori è la loro capacità di distribuire il carico. Il blocco di supporto e le superfici di guida distribuiscono le forze di iniezione su un'area di contatto più ampia, riducendo la flessione e l'usura rispetto ai sistemi di sollevamento meccanici più piccoli.
Problemi comuni dei cursori
1. Strisciamento e bloccaggio: lo strisciamento del cursore si verifica quando le superfici di scorrimento operano con una lubrificazione insufficiente, causando l'accumulo di metallo e il conseguente bloccaggio. Questo è particolarmente comune negli stampi che utilizzano materiali abrasivi come il nylon rinforzato con fibra di vetro o il polipropilene caricato con minerali. Una volta iniziato, lo strisciamento tende ad accelerare rapidamente e può infine causare il blocco del cursore e lo smontaggio dello stampo per la riparazione.
2. Carico eccessivo sul perno angolare: Quando l'angolo del perno angolare supera circa 25°, il carico laterale aumenta significativamente. Ciò accelera l'usura delle guide, dei blocchi di supporto e del perno angolare stesso.
Angoli più ripidi aumentano anche la forza necessaria durante l'apertura dello stampo, sottoponendo nel tempo l'intero meccanismo a uno stress maggiore.
3. Bave sulle superfici di chiusura: Le bave sulla superficie di chiusura del cursore indicano un posizionamento non corretto. Le cause comuni includono blocchi di supporto usurati, precarico insufficiente o una leggera deformazione del perno angolare.
Se non si interviene tempestivamente, l'accumulo di bave può accelerare l'usura sia del cursore che delle superfici di accoppiamento.
4. Disallineamento della fasatura: Una fasatura errata del cursore può causare gravi difetti. Se il cursore si muove prima che il pezzo si sia completamente rilasciato, può trascinare il pezzo lateralmente, provocando graffi superficiali, deformazioni o distorsioni dimensionali.
Soluzioni di progettazione e migliori pratiche
Mantenere la geometria del perno angolare tra 15° e 22° per bilanciare la forza e ridurre il carico laterale.
Realizzare scanalature di lubrificazione dedicate sulle piastre di usura e assicurarsi che il grasso raggiunga tutte le superfici di scorrimento.
Utilizzare materiali autolubrificanti come bronzo AMPCO, boccole Oilite o inserti di usura in materiale composito.
Implementare un sistema di ritorno a molla per garantire il completo inserimento del cursore prima della chiusura dello stampo.
Progettare angoli di bloccaggio del blocco tallone 2-3° più ripidi rispetto al perno angolare per garantire una chiusura sicura sotto pressione.
Aggiungere un sistema di ritorno anticipato dell'estrattore in modo che i perni di espulsione si ritraggano prima del movimento del cursore, evitando interferenze meccaniche.
Suggerimento:
Un cursore ben progettato dovrebbe dare la sensazione di un meccanismo di precisione: fluido nel movimento, preciso nel bloccaggio e costante dalla prima all'ultima stampata.
Le buone prestazioni raramente dipendono dalla complessità. Derivano dai principi fondamentali: la scelta dei materiali di usura appropriati, la garanzia di una lubrificazione adeguata e la progettazione di un sistema di ritorno meccanico affidabile.Quando questi principi di base sono corretti, lo stampo funziona con interventi minimi.
Tuttavia, il cursore più conveniente è spesso quello che non viene mai costruito. Valutate sempre se una piccola modifica al design del componente può eliminare completamente il sottosquadro. Semplificare la geometria di solito porta a costi inferiori, maggiore affidabilità e manutenzione più semplice.
PER SAPERNE DI PIÙ
Tempo di ciclo dello stampo: la leva di profitto nascosta nello stampaggio a iniezione
Se avete trascorso del tempo in un reparto di stampaggio a iniezione, avrete notato subito una cosa: tutti parlano di qualità, ma il vero fattore determinante è il tempo.
Il tempo di ciclo non è solo un numero sul display della macchina, ma è direttamente collegato ai costi, alla produzione e, in definitiva, al margine di profitto. In molti progetti, il tempo di ciclo non riceve la dovuta attenzione nelle fasi iniziali. Quando diventa un problema, il design dello stampo è già definitivo e le modifiche risultano costose.
In questo articolo, analizzeremo cosa significa effettivamente il tempo di ciclo in officina, cosa tende a rallentarlo e dove è possibile apportare miglioramenti concreti, senza compromettere la qualità dei pezzi.
Cos'è il tempo di ciclo dello stampo?
Il tempo di ciclo dello stampo si riferisce al tempo totale necessario per completare un ciclo completo di stampaggio a iniezione. Questo include:
Chiusura dello stampo
Iniezione (riempimento)
Imballaggio e mantenimento
Raffreddamento
Apertura dello stampo
Espulsione del pezzo
In parole semplici: il tempo di ciclo è sostanzialmente il tempo che intercorre tra la chiusura di uno stampo e la successiva iniezione.
A prima vista, 25 secondi contro 30 non sembrano preoccupanti. Ma nella produzione continua, la differenza si accumula rapidamente. Col tempo, si finisce per avere meno cicli, il che significa direttamente una minore produzione a parità di risorse.
È qui che il tempo di ciclo inizia a fare la differenza, non sulla carta, ma sul bilancio.
Il costo della macchina per pezzo aumenta
I costi di manodopera ed energia aumentano
I tempi di consegna si allungano
Ecco perché i progettisti di stampi esperti non si limitano a progettare per "pezzi di buona qualità", ma per cicli efficienti.
Fattori chiave che influenzano il tempo di ciclo dello stampo
Il tempo di ciclo non è controllato da un singolo parametro. È il risultato di molteplici decisioni di progettazione e di processo.
1. Tempo di raffreddamento (il fattore più importante)
Il raffreddamento spesso rappresenta il 60-80% del tempo totale del ciclo.
Cosa lo influenza:
Spessore del pezzo
Tipo di materiale
Temperatura dello stampo
Progettazione dei canali di raffreddamento
I pezzi più spessi trattengono il calore più a lungo. Una configurazione di raffreddamento inadeguata peggiora la situazione.
� Se desideri cicli più rapidi, inizia con un raffreddamento migliore, non con un'iniezione più veloce.
2. Progettazione del pezzo
Le decisioni di progettazione prese nelle prime fasi possono determinare il tempo di ciclo.
Principali fattori che influenzano la progettazione:
Spessore uniforme delle pareti → raffreddamento più rapido
Evitare nervature/sporgenze spesse → minore concentrazione di calore
Angoli di sformo corretti → estrazione più rapida
Una cattiva progettazione = raffreddamento più lungo + problemi di estrazione.
3. Scelta del materiale
Le diverse plastiche si comportano in modo diverso.
Ad esempio:
PP / PE → raffreddamento più rapido
PC / ABS → raffreddamento più lento
Materiali rinforzati con fibra di vetro → richiedono maggiore controllo
Scegliere il materiale senza considerare il tempo di ciclo è un errore comune.
4. Progettazione e ingegneria dello stampo
Uno stampo ben costruito può ridurre drasticamente il tempo di ciclo.
Elementi critici:
Canali di raffreddamento ottimizzati (raffreddamento conformale, se possibile)
Posizione corretta del punto di iniezione
Sfiato efficiente
Sistema di canali bilanciato
Uno stampo medio "funziona". Uno stampo ben progettato genera profitto più velocemente.
5. Parametri della macchina
Anche con uno stampo perfetto, impostazioni errate della macchina possono rallentare tutto.
Parametri chiave:
Velocità di iniezione
Pressione/tempo di mantenimento
Impostazione del tempo di raffreddamento
Velocità di apertura/chiusura del morsetto
La messa a punto è importante, ma non può correggere una cattiva progettazione.
Modi pratici per ridurre il tempo di ciclo dello stampo
Ecco cosa funziona realmente negli ambienti di produzione:
Ottimizzare prima il sistema di raffreddamento
Aggiungere canali di raffreddamento vicino ai punti caldi
Utilizzare deflettori o gorgogliatori se necessario
Considerare il raffreddamento conformale per i pezzi complessi
� Questo offre il massimo ritorno sull'investimento.
Ridurre lo spessore delle pareti (quando possibile)
Anche una piccola riduzione può ridurre significativamente il tempo di raffreddamento.
Esempio: 3,0 mm → 2,5 mm può ridurre notevolmente il tempo di raffreddamento.
Ma è sempre importante trovare un equilibrio tra resistenza e funzionalità.
Migliorare lo sfiato dello stampo
Un migliore sfiato consente:
Riempimento più rapido
Riduzione delle bruciature
Pressione di iniezione inferiore
Il che, indirettamente, riduce il tempo di ciclo.
Utilizzare materiali per stampi ad alta efficienza
Inserti in rame al berillio (per le zone calde)
Acciai ad alta conducibilità termica
Questi materiali contribuiscono a dissipare il calore più velocemente.
Automatizzare ove possibile
Rimozione robotizzata dei pezzi
Espulsione più rapida e uniforme
La movimentazione manuale rallenta i cicli più di quanto si pensi.
Errori comuni che aumentano il tempo di ciclo
Siamo onesti: questi errori si verificano di continuo:
Sovradimensionamento dello spessore delle pareti "per sicurezza"
Ignorare il raffreddamento durante la progettazione dello stampo
Posizionamento errato del punto di iniezione che porta a un riempimento non uniforme
Impostazione di un tempo di raffreddamento eccessivo come margine di sicurezza
Tentativo di risolvere i problemi di progettazione modificando i parametri della macchina
Queste decisioni riducono silenziosamente i margini di profitto.
Tempo di ciclo vs. qualità del pezzo: trovare il giusto equilibrio
Ridurre il tempo di ciclo in modo troppo aggressivo può essere controproducente.
Si potrebbero verificare:
Deformazione
Ritiri
Tensioni interne
Instabilità dimensionale
L'obiettivo non è il ciclo più breve, ma il ciclo ottimale.
Considerazioni finali
Il tempo di ciclo dello stampo è uno dei fattori più sottovalutati nella redditività dello stampaggio a iniezione.
Non è solo un parametro di processo, ma il risultato di:
Progettazione intelligente del pezzo
Ingegneria dello stampo accurata
Selezione corretta del materiale
Processo controllato
Pensare al tempo di ciclo fin dalle prime fasi, quando il pezzo e lo stampo sono ancora in fase di progettazione, offre molto più margine di ottimizzazione. Una volta completato lo stampo, migliorarlo diventa molto più difficile e costoso.
FAQ
D: Cos'è un “Qual è un buon tempo di ciclo nello stampaggio a iniezione? R: Non esiste un singolo parametro di riferimento. Dipende dal pezzo: dalle sue dimensioni, dalla geometria e dal materiale. I pezzi semplici a parete sottile possono essere stampati abbastanza velocemente, spesso in meno di 20 secondi. I pezzi più grandi o più spessi di solito richiedono più tempo, a volte 40 secondi o più.
D: Cosa influisce maggiormente sul tempo di raffreddamento? R: Nella maggior parte dei casi, sono lo spessore della parete e la configurazione del sistema di raffreddamento all'interno dello stampo. Le aree più spesse impiegano più tempo a dissipare il calore e, se i canali di raffreddamento non sono posizionati correttamente, il ritardo diventa ancora più evidente.
D: Perché il mio tempo di ciclo è troppo lungo? R: Le cause comuni includono pezzi spessi, una progettazione del raffreddamento inadeguata, impostazioni conservative della macchina o una configurazione dello stampo inefficiente.
PER SAPERNE DI PIÙ
Perché i sottosquadri interni rappresentano un problema serio nello stampaggio a iniezione
Siamo onesti: i sottosquadri interni sono un incubo per i progettisti di stampi. A differenza delle caratteristiche esterne, non possono essere gestiti con i cursori standard.
Se la geometria non è progettata correttamente, le conseguenze sono gravi:
Pezzi bloccati in modo permanente sul nucleo
Danni o graffi superficiali
Rottura dell'asta di sollevamento
Costi di fermo produzione
Quando si ha a che fare con clip o sporgenze interne, il sollevatore per stampi diventa la soluzione meccanica più affidabile.
Come funziona un sollevatore per stampi: il principio del "passo laterale"
Un sollevatore per stampi non si muove come un cursore tradizionale. È invece azionato dal sistema di espulsione.
Durante il ciclo di espulsione:
Il sollevatore si muove verso l'alto con la piastra di espulsione
Contemporaneamente, segue una traiettoria angolata
Questo crea un movimento combinato verticale e laterale
Questo movimento laterale, spesso chiamato "passo laterale", è ciò che libera il sottosquadro.
Regola di progettazione fondamentale
Considerare sempre almeno 2 mm di corsa extra oltre la profondità del sottosquadro.
Qualsiasi valore inferiore aumenta il rischio di:
Segni di trascinamento
Graffi superficiali
Sgancio incompleto
L'errore più comune: Angolo di sollevamento errato
Uno dei maggiori errori di progettazione è quello di impostare un angolo di sollevamento troppo ripido per risparmiare spazio.
Angolo di sollevamento consigliato
Intervallo ottimale: 5° – 11°
Zona di rischio
Oltre 15°: Alto rischio di bloccaggio e rottura
Con angoli più ripidi:
La forza laterale aumenta significativamente
Il movimento verticale viene limitato
Il sollevatore potrebbe bloccarsi o l'asta potrebbe piegarsi
Quando gli angoli ripidi sono inevitabili
Se il progetto impone un angolo maggiore, considerare:
Base del sollevatore incernierata
Design del sollevatore con scanalatura a T
Questi accorgimenti contribuiscono a ridurre lo stress sull'asta del sollevatore e a migliorarne la durata.
Scelta del materiale: Prevenire grippaggio e usura
I sistemi di sollevamento operano in condizioni di:
Alta pressione
Alta temperatura
Continuo contatto metallo-metallo
La scelta del materiale sbagliato può portare al grippaggio, in cui le superfici si saldano tra loro e si rompono.
Materiali consigliati
Acciaio per utensili H13
Acciaio pre-temprato 718H
Linee guida sulla durezza
Obiettivo: 50–54 HRC
Mantenere il sollevatore leggermente più duro del nucleo
Opzione ad alte prestazioni
Per tempi di ciclo più rapidi:
Utilizzare inserti in rame al berillio
Vantaggi:
Dissipazione del calore più rapida
Tempo di raffreddamento ridotto
Maggiore efficienza produttiva
3 consigli degli esperti per un design del sollevatore a prova di bomba
1. Aggiungere una guida "di coda"
Supportare sempre la parte inferiore dell'asta del sollevatore con un blocco di guida.
Senza supporto:
L'asta vibra
Le vibrazioni causano bave e usura
2. Utilizzare scanalature per l'olio
L'attrito è il nemico di qualsiasi componente in movimento.
Buona pratica:
Aggiungere scanalature di lubrificazione alle superfici di scorrimento
Eccezione:
Stampi medicali → utilizzare un rivestimento DLC al posto dell'olio
3. Controllare l'accoppiamento della linea di separazione (PL)
La superficie di chiusura del sollevatore deve adattarsi perfettamente al nucleo. Anche un gioco di soli 0,01 mm può causare:
Linee di riferimento visibili
Qualità superficiale scadente
Sollevatore o cursore: quale scegliere?
La scelta tra un sollevatore e un cursore dipende interamente dalla posizione del sottosquadro.
Utilizzare un cursore quando:
Il sottosquadro è esterno
C'è spazio sufficiente per il movimento laterale
Utilizzare un sollevatore quando:
Il sottosquadro è interno
Lo spazio è limitato
I sistemi idraulici non sono pratici
Considerazioni finali
Un sollevatore per stampi è una delle soluzioni più efficienti per i sottosquadri interni, ma solo se progettato correttamente.
Controllando:
Angolo
Spazio di movimento
Scelta del materiale
Supporto strutturale
È possibile trasformare una caratteristica ad alto rischio in un meccanismo affidabile e ripetibile che mantiene la linea di produzione senza intoppi.
Hai bisogno di aiuto per ottimizzare la progettazione dello stampo o risolvere sottosquadri complessi? Visita www.xinkeymould.com per ottenere supporto da esperti e migliorare le prestazioni dei tuoi utensili.
PER SAPERNE DI PIÙ


